Digital Marketing · UX / Design
AR Application: What does the world look like for colourblind people?
I have repeatedly asked myself this question. Considering different forms of colour blindness plays a significant role for designers. For common colour combinations, such as red with green tones, it is widely known that these should be avoided. The internet offers a multitude of definitions and explanations of how colour blindness affects perception. However, neither superficial theory nor illustrative examples truly answered my question. I wanted to experience the feeling and reality of colour blindness in the real world to better understand it. In everyday life, with objects and situations familiar to me.
Having recently reported on Augmented Reality several times and already presented our first filters for the Eurovision Song Contest and Life Ball, it was a logical step to use this technology to realise this experience.
Thus, the idea for a camera filter that simulates colour blindness using a live camera feed was born. With this, we aim both to allow everyone to experience colour blindness and to demonstrate that FaceFilters do not solely have to be used for fun and games. Rather, they are also a perfect tool for raising awareness about specific issues.
Anyone who wants to discover their own environment with different types of colour blindness can try our filter for Instagram and Facebook. The two links will automatically redirect you to the Instagram or Facebook camera. If you follow us on Instagram, you will also find the filter under the effects in the Instagram camera. We are excited to see what your world looks like with colour blindness. Show us using our filter and tag us in your photos.
In this blog post, I want to share my experiences and the challenges in implementing the filter. Our previously implemented filters were based, more or less, on static image material. In addition to the tracking functions, i.e. detecting the position and orientation of the face, images that had been pre-processed were overlaid on the face. This time, however, the current camera image had to be analysed and processed live. So I had to delve into the topic of “shaders”, which I had successfully ignored until now.
What is a shader?
Simply put, in computer graphics, shaders calculate the appearance of objects. This requires a complex sequence of calculations (element position, reflection, lighting, colour, etc.). These calculations must be performed for every pixel displayed. Thus, it can provide different results individually, depending on its position in space. Fortunately, we are not programming entire 3D worlds, as would be the case in computer games or VR. Some effects, such as lighting or reflection, are already provided by the camera image in our case. To reproduce the actual image as realistically as possible with colour blindness, only the colour of individual pixels is changed. But how must the colour of each pixel be changed to simulate colour blindness?
Goodbye sRGB – Hello Wavelengths
I researched this question extensively. To understand how colour blindness affects perception, one must first know why it occurs. At this point, I would like to briefly refresh our school biology lessons.
As we know, the images we see are created with the help of our eyes. Light reflected from the environment hits our retina. There, receptors, called cones and rods, “translate” the light into signals, which are transmitted to the brain and assembled into an image. While the rods are responsible for detecting light and dark, the cones enable us to recognise colours. This is precisely the point relevant to colour blindness. The eye contains three types of cones for the different wavelengths of light – S-cones for short wavelengths (blue tones), M-cones for medium wavelengths (green tones), and L-cones for long wavelengths (red tones). If certain cone types are defective or absent, the corresponding colours cannot be processed or can only be processed to a limited extent. In tritanopia (blue colour blindness), this affects the S-cones; in deuteranomaly (green colour blindness), the M-cones; and in protanomaly (red colour blindness), the L-cones. The common term “red-green colour deficiency” therefore combines deuteranomaly and protanomaly, as these colours are difficult or impossible to recognise or distinguish.
So, we now know that the eye works with an LMS colour space, which I could use. It is also known that displays, i.e. our mobile phones and mobile phone cameras, work with an sRGB system. Since the output image is delivered in the sRGB colour space, but colour blindness affects the LMS colour space, I had to find a way to convert the output sRGB image into an LMS image.
All Mathematics
And once again, I had to devote myself to a detested subject that I had managed to avoid for so long – vectors and matrices. I had long buried the question of why I had to learn all this during my studies. But finally, I had found a practical application. Since colour perception is very subjective due to the physical functioning of rods and cones, standardisation and representation of all visible colours are required. There are different approaches for this, depending on the area of application.
In addition to the already mentioned sRGB and LMS colour spaces, many others exist for different applications. Printers, for example, use the CMYK colour space, in which all colours are defined as a combination of cyan, magenta, yellow, and black. The HSV colour space divides colours into hue, saturation, and value.
A first attempt at standardisation dates back to 1931. Based on the functioning of the cones, the XYZ colour model was developed, which later became the basis for many other colour spaces, including the sRGB colour space. A common denominator between LMS and sRGB was thus found – the XYZ colour space.
Back to our shader. As mentioned, each pixel is represented by its red, green, and blue values – also known as a vector. By multiplying this sRGB vector by a transformation matrix, the colour can be mapped as a vector in the XYZ colour space.
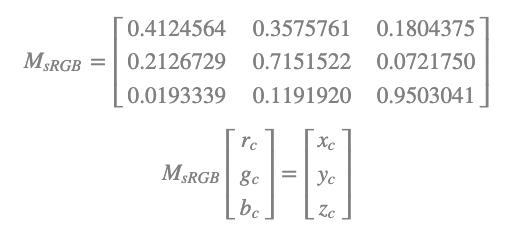
Afterwards, the XYZ vector can again be multiplied by a “Hunt-Pointer-Estevez Transformation Matrix” to represent it in the LMS system.
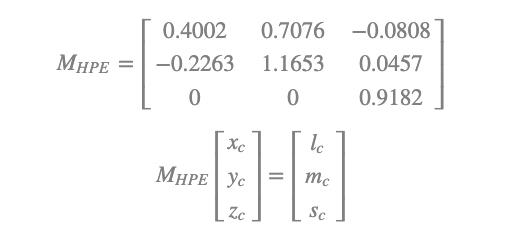
Finally, we have converted a pixel from the camera image in the same way it is processed in the eye. Instead of one value each for red, green, and blue, the vector now has values indicating how strongly the L-, M-, and S-cones are stimulated by the current colour. As mentioned before, colour blindness is based on impaired cone function. To simulate the current LMS colour with colour blindness, a corresponding simulation matrix must be multiplied by the vector. To achieve a strong effect, complete colour blindness is simulated.
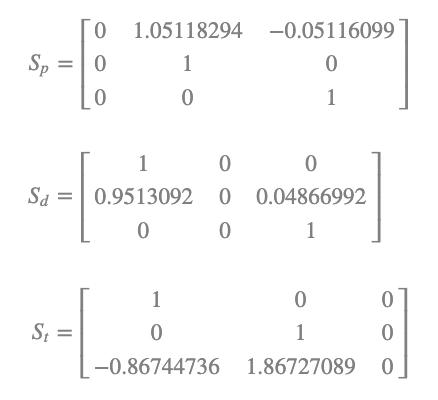
After simulating the colour value with colour blindness, we must reverse the transformations to display it again. Using the corresponding inverse transformation matrices, the adjusted value is first converted from LMS back to XYZ and then further back to sRGB. Thus, our original sRGB value from the camera is ready as an sRGB value with simulated colour blindness for output.
All these calculations are performed for every single pixel captured by the camera. Fortunately, shader calculations are quite performant, and we achieve a smooth transmission. Of course, I did not invent or calculate all these transformation matrices myself. As a starting point for this project, I came across a very helpful article. If you want to delve deeper into the subject and understand exactly how the transformation matrices are derived, I recommend Color Blindness Simulation Research at this link.
In addition to the for me quite complex mathematical formulas and calculations, I learned a lot about colour spaces and the function of shaders through this project. Especially the latter point is becoming increasingly relevant for other, more complex AR applications and will therefore continue to occupy me. If you want to delve deeper into this topic, I can recommend The Book of Shaders. During my research, this book was repeatedly recommended to me. It provides a good and understandable overview of how shaders work and how to program them. Especially for those interested in the VR field, shaders are an indispensable component for achieving realistic results.